Briony shares application tips and tricks using some of our best-selling pink products.
TRANSCRIPT
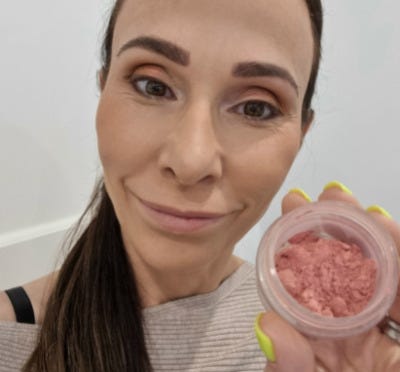
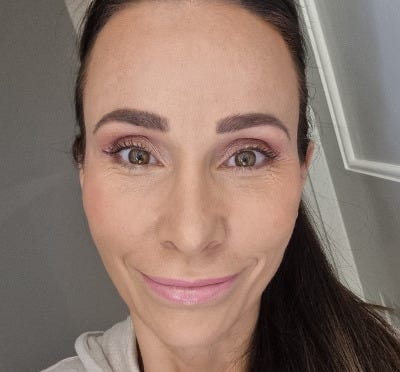
Hey Adorner's, it's Briony Kennedy here and today i'm going to bring to you a tutorial using all of our pink products well not all of them but some of the pink products just to celebrate national pink day so to get started i've of course prepared my skin and i've put my foundation on and the foundation that i've selected today was the hydrating cream in medium olive and i also applied the liquid radiance illuminizer or skin radiance and i've also applied the contour stick now i've blend all of those three products together in one application just super quickly so we can get started with all of the beautiful pink products for this day but hopefully you'll get to celebrate uh pink every day and pick out some tips and tricks that you might like to use at home so to get started i've also just quickly popped my brows on i'm leaving my concealer to the last so that i don't get any fallout when i'm doing my eye makeup so i'm going to apply the prime prep and blend onto my eyelid and i'm going to use the number seven brush to do that just to get rid of any discoloration on the eyelids but to also give some real intensity to the loose eye shadows putting a little bit of a cream like this prime prep and blend product or even a bit of concealer just gives a loose mineral eyeshadow something to stick to so you get much more of an intense look with your pigments you of course can apply them without this but if you want really super pigmented looking eyeshadow then this is a little tip it also means that this product helps to neutralize the veins on the eyes giving a more true color with your eye shadows okay so the first eye shadow that i'm going to put on to celebrate national pink day with our number nine brush is the pink pearl okay so the pink pearl is a beautiful soft pink color with a slight shimmer to it now i'm going to pop this on as a wash of color which means i'm just popping that all over the eyelid and i'm doing a very quick patting motion to pop this on i'm taking it right up to the brow or the brow bone area here and i'm very roughly blending it in i'm not spending too much time blending this in at the moment as i'll show you my little tip to do that at the very end so get the coverage to such that you're really happy with that color and blotting the eye shadow on just prevents as much fallout you don't get as much if you press it on of course tap off any excess so it's less mess to clean up but if you do get a little bit of fall out it's fine because you can then sweep it away because you haven't put your concealer on okay i'm really happy with the coverage of the pink pearl eyeshadow and now i'm going to pop on the beautiful rose quartz eyeshadow it's a very popular eyeshadow color it's beautiful on the lips if you want to use it as a multi-purpose product it's gorgeous using it as an eyeliner just wet your ankle brush so there's some extra little tips for you i'm going to put this brush this eyeshadow on rather with also the number nine and i'm just getting a tiny little amount and i'm just popping this into the crease of the eye okay now i'm going to just pop the rose quartz just a little bit higher up onto the brow bone what i love about these colors is they're quite soft so they're very easy to blend if you're a bit of a novice okay and having a little bit of shimmer in them too just makes them that little bit easier to blend if you're not keen on having a little bit of shimmer this is definitely not too intense but if you're not keen on that all you need to do is grab the oil control setting powder which is a white powder it's a pure mineral powder and you just need to dust it over the top once you've done your eye look and then that will tone down any of the shimmer if you're not into that a little bit of a luminescence that these eyeshadows give it's more in a luminescence definitely not a shimmer okay so the tip that i have for you at the very end when you're really happy with the overall look but it's just this area up here that you need to blend there's a couple of tips that i can share with you the first is to always have a clean brush handy and my favorite one is the number four the number four is one that i use to blend away any of this excess i can do it with just the brush by itself or i can use one of the other eyeshadows like the base nude invincible or even the oil control setting powder and what this does is it just gets rid of any of the line between the eye shadow and that clean skin underneath the brow so rather than continuing to blend up and ending up like you've got really dark eyes or the eye shadows just gone too high just stop it at your brow bone area and then use your clean brush to blend away any of the line so now we've got a really nice very gradual almost like a smoke up to the brow area now if you're wanting to intensify under the brows then you might want to use something like the invincible that's a beautiful color that will give that real definition to the brows otherwise you can just leave it like this as i'm going to okay clean up any fallout that might have dropped under the eyes and now i'm going to pop on some of the trusty peachy sleep concealer of course just to hide any of these dark circles and i have quite dark circles under my eyes so you can see very instantly how much that has given my face a lift to this side and it looks very natural so when i'm putting my concealer on i tend to get it on my ring fingers and pop it on like an eye cream so i just blot it in the corner and blend patting it like i would an eye cream i try not to put too much concealer in this area where we smile and we have our creases okay or any of the wrinkles or fine lines my focus is very much applying it here and then blending it out so blending it out to that area will give you some coverage but very fine most of the coverage will stay where you applied the product okay so happy with that coverage now i'm going to move on to my pink cheeks before i finish off my eyes so one of my favorite looks is to combine two blush colors and the very first one that i'm going to use is the spring cream blush it's a very nude baby kind of pink and i like to pop it on this part of my lower base of my thumb pop it on both sides and then i like to blend this right around my cheekbone up into my temples to give the face a bit of a lift and you can see it's just given a really nice gentle pink flush now that might be all you need for this pink look but if you're wanting a little bit of pop of color then you might want to try the summer cream blush so that's a really nice bright pink that you can use as a pop just on the apples of the cheeks and again i just put a tiny bit on both ring fingers and in very quick tapping motions i'm just going around in a circular fashion on the apples of the cheeks try not to pop your blush too low on the face because it will drag the face down unless of course you do have quite a round face then yes you would apply it a little bit lower to give the illusion of a thinner face but if you've already got quite a thin face try and keep the blush a level with the middle section of your nose so that's given a beautiful burst a pop of color and that's my little tip to making natural blush on the cheeks is to coordinate two colors one that's more of a neutral that you can pop all the way up to the temples and another one that you can pop as your bright color on the apples of the cheeks so your bright colors might be a little bit daunting but that is a way that you can use them without looking like you've got the clown streaks right up and down or the nike ticks on your cheeks so that is the blush finished now if you wanted to at this point you could definitely put on the cream illuminizer okay so that is our new cream highlighter okay it's got more of a pink undertone which is fabulous i know a lot of people were wanting um something that had a bit more of a pink to it you could of course use your loose mineral highlighter if you're wanting to but i'm going to use this beautiful new cream on the apples and the tops of my cheekbones just to give that really nice radiance really natural radiance right up into the temples you could pop it in the middle of your forehead if you wanted to you could pop it on your lips i like to pop it in the center of my lips because that way when i put my lipstick on this part of my mouth stays a little bit lighter to the rest of my mouth and that gives this ombre look where the center of my mouth looks bigger so it creates the illusion that my lips or my pout is bigger than it actually is so pop your cream highlighter on and then what's left on your fingers just rub that into the middle of the mouth really blending well so it doesn't stick to any dry skin and remember my tip with lips you can always pop on the barrier balm or our lip balm first to hydrate those lips before you put on a lipstick okay so the lip color that i'm going with today is the beautiful sofia from the style icons range you can see that i love this it's halfway used and i'm just applying this free hand with the lipstick itself it's a really creamy lipstick i love this one it's also quite nice on the cheeks as well okay so then i'm going to pop the amal gloss over the top which is this beautiful baby pink just to really amplify and make my lips look that much bigger for those of you that struggle with lipstick staying put or lip color staying put stick to lipsticks pop the oil control setting powder on your lips first that will give the lipstick something to grab to and help prevent it from bleeding okay and then maybe if you really still want to try a gloss just keep the gloss to the center part of the mouth which will prevent this outer corner from bleeding so there's a little tip with getting your lipstick to stay on a bit longer okay so the next thing that i will do is curl my lashes now you might like to put eyeliner on but for me today i'm just going to keep this really natural so no eyeliner but you might want to and popping the lash primer on just so we get nice long looking lashes i focus it on mainly the outer corner of my eyelashes rather the inner corners that way my eyelashes will appear longer and will appear to have more volume and they will also just help correct the shape of your eye if you're focusing on this outer corner if you're trying to create the illusion of bigger eyes if you've got quite big eyes already and you're trying to make the maybe look a little bit smaller then definitely focus on putting the same amount of mascara the whole way around the top but if you're trying to make them look bigger let's try and focus on the lashes on the outer three quarters now you might like to let that dry for a little bit that's totally up to you i'm going to let it sit for just a little while whilst i do the underneath part of my eyes so i'm going to grab the number 14 which is an angle brush i am going to wet that with some rose water you could just use plain water and i'm dipping it into the rose quartz and i'm going to use it as a little bit of definition underneath the eyes so by wetting the brush it just makes it go on more intense if you want this color to be lighter then you use a dry brush i also like to use a wet brush at this point because it's just less likely to get any fall out because the minerals will be wet rather than dry so that's another little tip for you okay if you feel that the line's too severe you could definitely grab one of the blending brushes like number eight and just very gently tickle along that bit of color that you've put on just to make it more natural i do like having a bit of color underneath my eyes it just gives some height so you can see now my eyes look a lot bigger than before when i had no color underneath now popping the mascara on you'll notice that my focus is mainly the outer lashes and i probably only do one or two coats on the inner lashes and i'm going on the top of my lashes and rotating the brush around to make sure i pick up any of the eyelashes that might be not within the reach from underneath the brush so i you will notice that i'm sort of popping it on the top and rotating it to make sure i grab every single lash one of my tips is to grab the brush at the end and the mascara that you'll find on the tip of your wand i like to just tickle these outer lashes rather than loading up the lashes anymore with mascara at the base which can cause the lashes to be weighed down and droop over the day to get the extension of the lashes just use the mascara that's at the tip of the wand and tickle the ends of the lashes see how much longer this is to that side okay but i've not created weight which may drop the lashes by putting more and more mascara on that can often just give you width and thickness but it may not give you the length okay so loading it up too much can cause the opposite effect of what you're trying to achieve okay so tickling these lashes now with the end of my brush using the tip of your brush too can just help you spread out any lashes that might be clumping together as well now i am using the hello lashes today and i'm using a brown because i just feel like it's quite nice and soft with the pink so you can see look how long longer my lashes look just by popping that extra little bit on the ends there now you can put mascara at the bottom my tip to you is if that you've got sparse lashes not to do that because you'll draw attention to the few that you have if you struggle with mascara staying put definitely don't put it on the bottom you would be best off popping on a darker eyeshadow to give the definition rather than using a mascara definitely stay away from black mascara if you've got few lashes it will actually make that look more pronounced but if you've got uh you know the brown mascara it's much more soft much more natural and it can give the enhanced look of more lashes so i hope you've enjoyed my getting pink look today there will be a list of all of the products um within this email or within this tutorial or wherever that you're viewing this you will have a list of these products that you can use but definitely you can substitute it with one of the pink products that you have at home i hope you've enjoyed this tutorial thank you