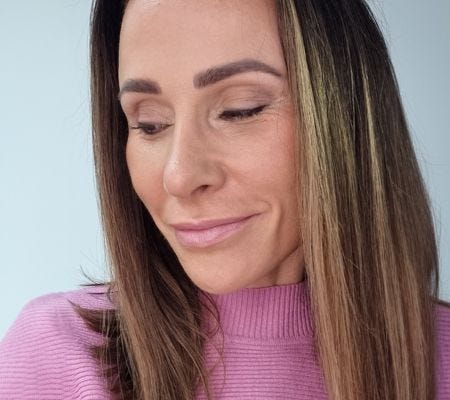
Briony shares her top techniques for a smokey eye glamour. Learn how to create a seamless blend and use dark shadow without aging your eyes. Don't miss part 1 where Briony uses the same palette for a different occasion.
TRANSCRIPT
Hi, I'm Briony, the founder of Adorn Cosmetics, and today I want to share with you a winter makeup look that really precautions dehydrated skin. So if you're feeling like your skin's looking a little crepey, maybe a little sore, then this is going to be for you. Of course, you can vary the different shades, but it's essentially putting as much water content ingredients on the skin that are going to help with skin barrier function. So not only will you look good, but it will also help protect your skin during the day. So things like heating cooling cool air when you go for a walk, all of these things that can extract the moisture levels from the skin and play have it to our already dehydrated skin. So let's get started with the skin care. Of course, I've cleansed my face with just a warm waffle cloth. I don't use any cleansers in the morning when I've got dry dehydrated skin because it's only going to take away the natural oils and all of the goodness that you've put into the skin the night before. And also, avoid hot showers. That is definitely going to cause havoc with your dehydrated skin. So all of the really harsh elements, really extreme heat or cold, is always going to cause more dehydration. So the first puncaution I'm going to do is use our rose water mist. This is going to help water levels in the skin temporarily plump the skin. But what it'll also do is help my serum penetrate the skin that much further because when the skin is damp, the serums or moisturizers can soak in just that little bit further. This serum that I'm using today is the Serum Copper Complex. So it's a puncautionary repair serum, and it's all about helping repair the skin barrier function, of course, heal, soothe. This has anti-aging properties in there, so if you are considering fine lines and wrinkles, then it will help target those and give you a smoother-looking complexion. But the reason I'm using this one today is more so around the hydration, that cell renewal, and also, of course, that skin barrier protection. So it's a kind of a clear, bluey color when it comes out. See that? And one pump is definitely enough. You can put that on your eyes and, of course, your neck. Now, if you want to, and I would advise it, it's great if you can do another little spritz of your rose water to help again with that hydration and with that serum penetrating.
Okay, so the next step, moisturizer. Moisturization. What we need to do is get as much water in the skin as we can, okay, just to help with that plumpness and the freshness and that dewiness, and just tell, at least for that day, look like the skin isn't so crepey and dehydrated. Of course, it's not just your makeup, but the things you do during the day that you're going to need to address to help with this dehydration, and that is limited coffees, drink lots of extra water, and as I said, stay away from things that are too hot or too cold. Now, the copper complex moisturizer is what I'll be using today, okay? Again, it complements this serum that I've just used. You could use another serum. Hyaluronic serum is an absolute amazing product to be using when you've got dehydrated skin. It helps retain water in the skin as well, but for this because I want that barrier protection and the cell renewal, I'm using something a little bit more concentrated in respects to my moisturizer. You could use, of course, our two-in-one daily primer moisturizer, which also is very good for dehydration. But today, I just need something with a little bit more actives in it. So I've gone with this copper complex moisturizer. It's very lightweight, which is great, especially if you're someone like me who has got dehydrated skin but you don't want to feel the thickness on the skin. You also don't want anything too thick because you don't want that to hinder the way your makeup lasts throughout the day. Now, the last step would be your sunscreen, okay? If you're going to use sunscreen, then you may not want to use a face oil. It may be too much. I'm not planning on being in any sun today, and in fact, there's none anyway, so I'm going to go straight to a face oil. And the face oil I'm using is the borage and bakuchi oil. The reason I'm using this one is it's not only amazing on redness, so if you do have say rosacea sensitive skin, it's not only extremely calming, it's a very natural retinol as well. So you don't need to stay out of the sun because this is a natural retinol. So it has all the amazing anti-aging, or we're all about pro-aging, but if you're worried about fine lines, it helps with all of that, but it's extremely good for dry, dehydrated, and sensitive skin. It will calm that redness. So give it a little while, and you'll notice a big difference, but for me, it's about getting that look at the dewiness already of my skin with just the skincare products. So at least now, my face has had the water popped back into it through the spritzer, the serum, the moisturizer, and then think of your face oil as being the food, the nourishment that the skin needs. It also helps lock in all of those products so that they don't obviously go into evaporate into the air. They stay in your skin, but without being congesting. The face oils are non-comedogenic. They will not cause poor clogging, etc. Very lightweight as well and work beautifully with the Adorn makeup.
So skincare side, I'm now going to put on our BB cream, keeping in line with the dehydration. I want something that's going to help plump up my skin, also give it some nourishment. So this has natural BB cream vitamin C, and it also does have hyaluronic acid. So this BB cream is super popular with our mature skin, menopausal skin, all those of you that just have dehydrated skin. The color I'm using is medium tan. It's in an airless tube, which is quite unique, so you will get full use of the product. And I'm going to pop it on with our best-selling Kabuki brush, which applies all of our foundation types. So I just pop on one pump at a time. Okay, so the next product I'm going to put on is our illuminizer. Now, this one is the number two light one, so it suits all skin types, especially if you're on the fairer side. And it's got a really nice sort of a salmon sort of a fleck to it or a luminescence to the skin. It gives a really nice dewy and radiant look. You could put this on first, you could mix it with the BB if you're putting it on with your fingers, or you could do a pump of each on your Kabuki brush. That's totally fine. I'm just going to put a little bit on after because this one's a little bit lighter, and I just want to see a bit more of that luminescence. It is also an Airless pump, so when you first get it, you might need to pump that just a few times to get it working, and one pump will be enough for both sides of the face. Now, I'm just focusing on a "C" shape. I'm popping it above my brow, around the temples, and the cheekbone. Now, the reason for that is one, it's where the sun or light would naturally hit to see that look, so you get that beautiful radiance in the light. But the other reason, so that radiance and that light gives that dewiness to the skin, but the other reason I put it here in this "C" is that when you make this area a little bit lighter and more dewy, it just gives you a slight appearance of an arch or a higher brow. Okay, it gives a bit of a lift as we get older, our temples start to sink in a little bit, so making that a little bit lighter and more luminescent is going to look bigger, and of course, along the cheekbones, it's going to make them look bigger and stand out also. This one is so pretty, you could actually put it all over the face if you wanted a really sheer makeup day. It has got a little bit of coverage to it. Put the rest in the middle of my forehead there, so see? Oh, look at that, look at the dewy factor. I love it. Um, so I'll just show you, it has got a little bit of coverage, as you can see. It's not sheer. It does have a slight bit of coverage to it, so it is beautiful to wear by itself. It's even good for the younger girls who maybe want to start wearing a bit of makeup and have that dewiness. So look at how dewy. I definitely need some concealer, but wow, love this dewiness.
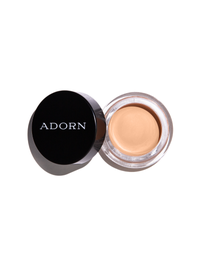
Okay, concealer on so we can just see this even looking more beautiful, and of course, we'll be using the Peachy Sleep Concealer, another super popular product in the Adorn range, and I'm just going to use my ring fingers, softest, less pressure, and I'm putting it in the corners where we're all a bit dark in there, and I'm just going to show you actually one side to the next. Check out the coverage this gives. Now, I'm focusing just on this area here, the coverage, because that's where the darkness is. You can't hide wrinkles with concealer. You can make wrinkles worse, so avoid putting your concealer out this area where we all have smile lines or some of us may, some may not, but just put it in this area here, so you're almost doing a backward "C," a little bit up there in the corner and around. Now, you can blend out so that you don't look like it's all concentrated here. You could definitely blend it out, but don't put product there. It's going to grab and it's going to crease and collect into those happy lines that I'm hoping you all have. Look at that amazing difference. Okay, why wouldn't you wear this? All right, so there's a Peachy. Have a look at this one disappearing. I like to use my finger too because I feel like I get a bit more coverage as well than what I would from a brush. Foreign, whatever left on the fingers, don't waste it. Just pop it on your eyelids to help neutralize the veins there and then just blend it out a little bit if you need to. But look at that coverage, love it, and the dewiness. Can we just appreciate this dewiness? Oh, I love it. Okay, all right, so moving along as I'm loving myself sick right now with all this dewiness, it's going from dehydration to absolute hydration here. Okay, so moving along, I am going to put a little bit of the tinted eye primer on my eyelids. I just want to neutralize the veins on my eyelids a little bit. And contour. I'm not really wanting to wear an eyeshadow. This is perfect under an eyeshadow because it not only makes eyeshadow a bit easier to blend as you've got a cream underneath it, but as I said, it neutralizes discoloration and it also looks like a really nice nude shadow. If you've got smaller eyes, it's amazing also because it's going to make the eyes look a little bit bigger because lighter colors will make things look larger. Okay, now if you're someone who suffers from your eye makeup moving and you want to put an eyeliner or something on, now you can always dust over the top with like our HD Miracle blue or our setting powder just to lock down and just put it where you need it. If you feel that your makeup moves off your nose, dust a bit there. Just don't put powder all over your face, especially when you're going for this dewy look.
Okay, so the next thing that I'm going to put on is this delicious cream contour. Now, there's a couple of different colors. The original one is probably what suits most people, okay, and then if you've got more of a tanned skin, the other shade would be one. So this is just the standard zero one, and I think the other one is zero two off the top of my head. And all I'm going to do is you can wind it up actually. You can wind it up, and then I'm just going to draw where I want it, or you can use your finger. Okay, so again, you can use a finger, and you can just dab that on. Now, a finger is going to be a good one if you've got lighter colored hair and you don't want this to get into your hair. The other trick is you can just hold your hand like this and just blend like this, so you don't go into the hairline. Or of course, where is it, my trusty biodegradable blender? I like to use it to dampen. In fact, you should use it damp. It's about three times the size when it's wet like this. So let's show you using the blender. Now, the reason I'm using this cream contour is because it's got all of these amazing beautiful ingredients in it. So you've got things, and the same with the cream blush I'm using in a moment, you've got your jojoba oils, vitamin E. So again, ingredients that are going to look after the skin and nourish the skin as well as make the skin look amazing. To me, makeup should be skincare. It should care for your skin, and it should be an extension of the skincare products that you use. So, the reason I put this product here is because as much as I'm looking healthy and dewy, and I'm loving myself sick right now with all of this dew, it's more about now giving some warmth to the skin. Because I think you can get a one-dimensional look with just one product, being a BB or a foundation. So, this is going to give some warmth and cast a bit of a shadow. But if you've got a large forehead, it also doubles as an area that will shrink it a little bit as well. So, things that are dark, they look smaller. You can also use this to carve out some cheekbones or use it as a blush. Now, for those of you that have more of a narrow face like me, then you know, pop it horizontally rather than more vertically. This is going to give the illusion of width and a more fuller face. If you've got a full face and you're trying to make it look narrower, then of course, you can go down more horizontally. So, I'm just going to pop a little bit there and there. If you've got some excess skin that you're not too in love with here, you can put this underneath here. Again, make this part of your neck a little bit darker. Darker things look smaller, and you'll get this really nice curve structure around the jawline. Okay, so let's just go blending this in. And again, this winter look, as I said before, is all about just getting that nice and dewy finish, rather than looking particularly made up. Okay, so perfect for the weekend, perfect for work, perfect for whatever, whatever look. See there? See how that side of my face just looks a little bit healthier than this side of my face, just that warmth that this product has given. Now, if you've got a powder contour or our corrective contour, you could use that over the top. That's fine. But again, I'm doing this particular look for those of you like me with dehydrated skin. Now, what's left on my biodegradable blender, I just like to blend up a little bit onto this part of my eyes because I just don't like that really light sort of appearance around the eyes that you can get from concealer. I like to sort of bring it all together just with the little bit that's left on there. Now, if your nose is a little bit on the wide side, you can definitely put a little bit on the sides here like this if you wanted to, and then just blend that in. Real fuss. You could definitely do that. One of the things I am going to use today, though, before I move on to blush, is I am going to put on some concealer just around my nose where I just want a little bit more coverage.
Corrective Concealer. Um, then the BB has given me. So, I'm going to use the light again, got nutrient ingredients in there for your skin. Check out all of the ingredients on the Adorn website. We're a very transparent brand. You can read everything there, and everything has a purpose and is good for the skin. So, you could draw this on, but I want a little less than what I would if I was to pop it on. And I'm putting it into this deep sort of crevice here, which I've got some veins as well. But as we get older and these sink in a little bit more and look more obvious, we want to put something not too light because if you've got large pores, you don't want to enhance the look of your pores. So, remember, light things make things look bigger. So, we don't want our pores to look bigger, but we do want to have something a little bit lighter to help. See how that is ever so soft after? Then this side, now you can't get rid of lines, but look at the softness of that just by putting the light concealer. Now, of course, if you've got a darker skin, you'd pick one of the other concealer shades. But look at that, it is definitely softer than this side, okay? And then you can even bring that down here a little bit if you wanted to, but just make sure you blend it properly. You don't want to be seeing a white line, just to help. Look at that, it's just softened it. I love this, there we go, okay? And then, of course, you could just spot treat anything else that might need a little bit of extra coverage. Again, I'm not concerned about seeing some skin. I'm all for having some, seeing that natural skin come through. If I wanted anything heavier, I could do so. The beauty of this BB cream, too, is because it's so nutrient-rich with all the amazing ingredients in there, you could always use this as a base to your other foundation as well. So, you could use this over the top of your skincare, pop this on, and then put your loose foundation on just to get that extra coverage where you want it. Up to you as well, okay? So, moving on to the blush. Again, jojoba oil, awesome for healing and calming and very nutrient-rich for the skin. And you've got vitamin E as well, so it's a really beautiful natural color. Again, you could put it on your fingers, draw it, blend it however you want. So, I'm just going to draw it on the apples of my cheeks here, and these lighter shades are a bit more forgiving, especially if you're not very good at blending. So, I'm just really getting quite a bit on here, and notice I'm not putting it any lower than the edge of my eye here and probably about halfway through my nose. Again, I've got a narrower face, so for the more mature ladies or more drawn sort of faces, you really don't want this blush to go too far down. It's going to make you look thinner and more drawn. We want the face to be lifted. Okay, so I'm really putting quite a bit on so I've got enough to work with when I want to blend it, but I'm not placing the product too low. Wind up a tiny bit. Now, if you wanted to, you can use this part of your hand as well. It's a quick way of sort of blending it. But because I'm not putting too much on, I'm just going to use my ring finger, and I'm just going in a circular motion around where I've applied it. See, it's quite a natural blush. It's definitely one of our best-selling shades. And, cut, your other option is, of course, to come back to your blender if you wanted to, and you could definitely use that to blend the blush in as well. Or, if you've blended it too low, use it to just gently blend and flicking up ways to just blend away where you've gone down too low. Don't blend downwards because you're going to spread it down. Just blend up to get it back where you want to. Look at that, so healthy-looking. Loving this skin. Alright, the next thing that I am going to put on is the Plum lip balm. I'm just keeping this really simple. Now, with all of your tubes, whether it's a balm, a foundation, a little bit of a tip when it comes to using makeup tubes, don't ever wind up your product, no matter what brand it is, too much. Just wind it up enough that you can get use of it because the product inside the tube is sticking to the walls inside the tube. So, as you're winding your tube up, when you need to wind it back down again, there is some resistance with the product wanting to slide back down, okay? It happens with all products. So, with your tubes, don't wind them up any more than you need to because you may not be able to wind them down. And even if you do, you might find that some of the product collects and sort of folds over and then gets wasted. So, there's a little bit of a trick when it comes to using tubes, okay? On the lips, really popular balm, and you'll see why. It's just the perfect burst of color. I love this one for travel too because if I'm a bit like, "Oh, I don't know what I want to wear," I can just put a little bit on my cheeks, my lips, and you can also pop a little bit on your eyes as well, okay? So, that is it. In fact, I might even put a little bit of this, what's left on my finger from, yeah, just to give a little bit of something. Okay, now it's up to you whether you would like to put a bit of eyeliner on or leave it. I think today I'm going to just leave it. I
'm going to pop on my mascara now. So, I'm going to use the lash primer, of course, to get the longer, thicker lashes, and I'm going to use the brown mascara, and of course, our lash curler. Now, I'm going to quickly show you the difference between using a lash curler and not. So, of course, if I was to just put the lash primer on now, my eyelashes are just this short. I'm getting older, they're short, they're a bit more sparse, and for me, they're not curled upwards, okay? So, if I put mascara on now, there wouldn't be really too much difference to what you're already seeing. A little bit longer and a little bit more dark, I suppose. But using the lash curler, just wait for the difference. It's amazing. So, all you need to do is this part of the lash curler, this metal part, is align it so that it sits on your lash line and it sits on your eyelid, okay? And then, if you gently push, see how it's lifted those lashes for me? By gently pushing, most people try and grab the lashes, but all you need to do is a gentle push down. There's the lashes. Gently clasp down. Now, if you get any of these bottom lashes, just use your finger and just gently pull them out, okay? And then, you lift it up and into the crease of your eye, okay? So, it's really giving you a nice curl. Hold it for a couple of seconds, and look at that. I've got lashes to work with now. The other side, making sure you align it up with your lash line, pressing down on the lid to lift the lashes. Yes, I've grabbed a couple, so I'm going to unclamp it a little bit just to pull those bottom lashes out. Re-clamp, and then I'm going to lift it up like this. Eyelashes, okay? And then, once I've got to my mascara, I will then use it again because the mascara acts like a gel, and it will actually make them even more curly. So, a bit of lush lash primer, primer on. I'll just show you this step away from the camera for a moment to put my mascara on. I'm hopeless at doing this while I'm filming. Final look, and there we have my winter dewy skin look to combat that dehydration. Just to recap, we were using the BB cream. We used the cream contour, the liquid illuminizer. Of course, we've used the winter cream blush, peachy sleep, the plum lip gloss, and of course, our mascara and our lash primer, and the lash curler. So, if you're wanting to add in any other colors, that's totally up to you. But I think the whole key here is to try and use your liquids and your creams, those ingredients that are going to help plump up and really give that dewy, vibrant look to the skin.