Briony creates a fresh look for the brighter months ahead
See which products to apply with our Stippling Brush and Buff & Blend Brush.
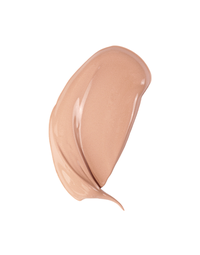
How to use liquid illuminiser.
How to cover dark circles using our Peachy Sleep Concealer.
The correct way to use a lash curler.
Create a natural makeup look without using foundation.
Can you pick which products are included in our new release Spring Mystery Bundle?
TRANSCRIPT
If you're into glossy, dewy, healthy-looking skin without it looking oily, and you're after something that's simple to do, it's great for every day. Maybe a barbecue, maybe you just want something really fresh, then this look is something I think you're going to love. It's one of my favorite go-to's and it doesn't involve any foundation. It's just illuminizers essentially.
So the first thing that I've done, of course, is prepped my skin. I've cleansed it, I've prepped it, and I've also put a little bit of facial oil on simply because my skin is a little bit more dehydrated, and it just helps add to that glossy, dewy look to the skin. So it's all about health and vitality.
To get started, I'm going to be using one of the darker liquid aluminizers in the Adorn range. In fact, I'm going to use two different colors. So I only put a little bit on my stippling brush at anyone. The product does dry pretty quickly, so I'm just going to put the lighter of the two on my cheekbones first, just because anything that's lighter will always make those areas stand out more.
Now I'm just avoiding putting the illuminizer under my eyes because obviously as we get more mature and we age, if you've got the fine lines or the crow's feet, the laugh lines, the living lines, whatever you want to refer them to, you just don't want something that's got that little bit of dewiness or that sparkle to get caught in the creases. So just put it anywhere that you want to get that dewy look. This also gives a bit of coverage, as you can see, which is great. And then if you really needed to, you could use a bit of concealer in the areas that need actual coverage.
Okay, so I've done that in the three points I want to highlight: my cheekbones, the center of my forehead, and then I might even just do a little bit on this part of my chin as well, where it sort of dips as we get a bit older. You could also put this one on your neck or your décolletage as well. It looks beautiful, it's super pretty, I'll just show you this Regina, which is great, and it's just got that really nice gooeyness to it.
So this will suit most skin tones, this particular illuminizer, even the fairest of our skins, it will look really beautiful on. If you've got a darker complexion, you might want to opt for our slightly darker one. Again, this does suit lighter skins as well, but again, I just like to use two different ones, the lighter one as I said on my cheeks and then this darker one underneath here to highlight my cheeks, but to give a really nice glossy look.
You're gonna see some of your imperfections, but that's not what this look's about. This is just about making the skin look healthy above any of the imperfections you're concerned about. And then yes, you can spot treat if you wanted to, like around the nose or under the eyes, that's up to you. I'll just put a little bit on the bridge of my nose. I have quite large pores, so I will put concealer around that area. I don't want to enhance the pores. And I'm going to put this on my neck as well.
Who knew you could use liquid illuminizer all over? And a little tip, it also looks amazing on your legs as well. And then this darker one, I'm now putting it on the outer part of my forehead and over the temples. You could put a little bit onto your eyelids if you wanted to.
Okay, and that's the skin nicely dewy. My top lip, so look at that, just without wet, still got to do a bit of concealing but really amazing coverage. Now a little bit of concealer around my eye area, so I'm just going to put the peachy sleep here and just on the areas where I've got those really dark circles, and I'm going to put a little bit on the outer corners as well where we are a little bit red, and that also blends it up, giving the illusion of a less droopy eye. So, if you're starting to get a little bit of a droopy eye here, putting the concealer up this way is going to create light reflection upwards, creating the illusion that your eyes are more lifted and less hooded, less droopy.
I'm just patting this on like I would an eye cream, almost making sure I get right in that corner because that's very dark in there. Now, if you've got puffy under eyes that you're wanting to disguise, make sure you use a concealer that's the same color as your foundation. Because puffy eyes will look worse if you put a light concealer on, think light things look bigger. So, you really want to help tone down that puffiness and the darkness by using a concealer that's the same color as your foundation.
For those of us that have more of a flat coloration, the peachy sleep concealer is completely fine and corrective. That's what turns down those dark circles. Now, if you did have a darker skin tone and you wanted to use the peachy sleep concealer, you can do that, but you might just need to put your darker concealer on over the top. So, use the peachy as purely corrective, and then put your darker concealer over the top of that to tone that down.
Now I'm going to put this also around that redness that I've got around my nose. Again, don't use a concealer that's too light. It must match your foundation or the illuminizer or whatever the base is for your skin, especially when applying it to areas that have got large pores like your nose.
If you suffer from large pores like I do, grab our buff and blend brush. It is the best brush for warming up the product and very dense and short brush. It's super soft but it really warms up the product. I have it around here, whether it's your forehead or wherever it might be, this is the best brush for that. You can also use it for creams as well.
Then what I like to do, I mean you don't need to do this step, but I just pop a little bit of our tinted eye primer on my eyelids because I just like to get rid of that little bit of discoloration from the veins. Compare this coloration to this side, it's like to even it out. You can use brushes, I'm all about this being a really simple look, minimal use of tools. I'm using more of my fingers.
Okay, so looking really healthy. Yes, you can still see a little bit of discoloration, a little bit of pigment, but ultimately it looks healthy and really nice and dewy. Moving on to blush, again, I'm going to make this a really nice fresh look. So, I'm going with the loose spring blush. I love this blush because it suits not only the fairest of skins, but it also acts like a bit of coverage. Because it's quite skin-like, if you do have a little bit of rosacea or you have a little bit of veining or some sort of discoloration, this blush, look at that. See how it instantly gave me a bit of coverage as well as just a little bit of blush?
So, if you're scared of blush, this is the best color for it. It's just so natural, but look at that coverage it's given me. Okay, so let's have a look at this area here. Not that blush is supposed to do that, but the bonus is this one does. And that's why with this look, I can get away with not wearing foundation. I've just gone straight to the liquid illuminizers. Look at that.
Let's add as much or as little as you want. Just remember with your blush, you can't really get this one wrong because it's so light. But you don't want to bring your blush down too low because it will drag the face down, especially with the darker or the brighter blushes. And if you've got a more mature face like myself, then you want to go across ways with your blush to give the illusion of a wider, less sunken-in face. If you bring your blush down this way, it's going to give that more sunken down appearance. Again, not as noticeable with a color like this, but definitely with your darker ones.
With what's left on the brush, I like to just sweep it over my nose a little bit over the eyes, and it just brings everything together. Should I just have blush, you know naturally when you flush, it sort of spreads everywhere and it's all very nice and even. So, you don't just want to have that appearance of just blush. So, I like to just gently without re-dipping, put the rest of what's on my brush over the rest of my face.
Okay, now you could stop right there, put your mascara on and be done. But a couple of little extra things that you could do to ramp this up is adding in a pop of color. I'm using the coral's Radiance in Wind Up and here you really only need a little bit. The reason I'm using two colors is simply that when you want to use a brighter color, putting a more neutral color underneath it makes it look really nice and natural because it's like it's got this brightness and then it gets lighter and lighter. It just really emulates or emulates rather the natural flushing that the cheeks have.
Now, I had that much on and then I swapped to my fingers because it was just going to be too much. That's just how pigmented it is. So then you can go back to the finger that you've got the product on if you want a bit more, and then use another finger to blend it out. You could use the rest of this on the eyes as a bit of eyeshadow. I often wipe it on my lips, whatever's left, and I tend to do this with a lot of the blush colors.
I always just pop it on my lips, and then I put a gloss over the top, and it looks like I've got this unique color. Okay, so there we go, and then what I'm now going to do is pop on even more aluminizer because we can never have enough.
Now, the blush brush that I used was the number two, the really nice big fluffy one. The fluffier the bristles, the less dense the color is going to be; it's going to be more natural. If you want a more heavier appearance, then you use a brush that maybe has slightly shorter bristles and is more dense, as in there's more of those bristles that will deliver more product, more color to the area, giving more intensity. Okay, that's how you can kind of gauge what tools to use. Do you want it to be really intense? Pick a shorter, sort of more dense brush. If you want it to be less and more natural, pick a longer, less dense, more fluffy brush.
Now, I'm going to use the number three, which slips around the wrong way, is in the also that same 15-piece kit, and I'm using the loose illuminizer. The reason I'm using a different illuminizer is a couple of reasons. The Skin Radiance aluminizers give you that dewy Radiance look, that all-over skin glow. Okay, the cream aluminizer does the same thing; you could put it over the face if you wanted to as well. The loose aluminizers are what actually highlight more. So, if you're wanting to really get the cheekbones to stand out, I'll show you how to make your lips look bigger. If you really want to enhance the bridge of the nose, think of your liquid products as being more for that all-over Radiance. Your loose or your cream, you can pinpoint a little bit more and make them more of a highlighting product.
So, I'm going to use the cream illuminizer just under my eyebrow. Again, you could use this; actually, let's just put it all over. You could use this as a nice all-over eyeshadow. Yeah, actually, all right, so cream illuminizer all over my eyes from lid to brow. I'm going to pop a little bit of that in the corner to really brighten up my eyes as well.
Okay, that was the cream, and now we're going to move on to the loose. One of the areas I really focus on is the temples, especially if you are older. Maybe you've got quite a thin face; we get this sunken-in appearance as we get older, so it can be again quite aging. So, put your aluminizing products in this area. If you've got a lot of crow's feet, you do need to bear in mind that it may make them look more so. Just put a little bit on and then weigh up what you want. It may enhance them a little bit, but it also will make this area look fuller. It's about that fine line of correcting one thing but not over-enhancing something else.
Again, I'm going to put a little bit of this above my brows, creating light reflection there gives the illusion that my eyes have a lift. Okay, and I'm also going to put some on the bridge of my nose. You can even use an eyeshadow brush to get this more specific or traded, or a finger like I have there. The tip of the nose, again, just avoiding any and you can also pop this on the top of your Cupid's bow. So, watch how big this makes my lips look compared to not. So, you just gently apply it to your lip line, naturally curl to the lips.
The next step with the loose is you could also put it on the bottom, and you could also put it in the middle part of your lip. Now, what that's going to do when you put a gloss or lipstick over this is going to keep this area lighter and more luminescent, making this area look like you've got more of a pout, hence bigger-looking lips. You can also pop this again if you're wanting something really highlighting in the middle here to open up and awaken those eyes and make them look nice and bright. Freshen the whites of the eyes, standing out. You can pop this in the corner.
Okay, and then we're done. But if you're wanting to add a little bit of warmth, you could definitely use this color in our face palette using the same brush or preferably a second brush because obviously if you're going to use this dark color and then use the illuminizer, it's going to be distorting. Obviously, the pigments, you probably need one for both, but you could just put a little bit in the corners of your hairline like that. That's going to give you a bit of warmth if you're feeling a little bit pasty. You can definitely do that.
Okay, now in the event you've put too much on, brush. You get your buff and blend or you could even get your...