Post updated 06, September 2023
Briony shares her expert tips for achieving a longer-lasting manicure using Adorn’s toxin free, Australian made nail polish.
Step 1: Ensure your nails are clean to avoid getting dirt/dust in your nail polish.
Step 2: Gently push back your cuticles and file/buff nails if needed.
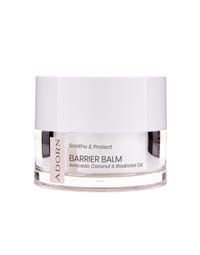
Step 3: Ok get ready for this. This a-mazing ‘mess proof’ polish tip will have you adding Adorn’s Soothing Barrier Balm to your next order - especially if your hands are a little shaky.
Apply a thin coat of Soothing Barrier Balm (using a cotton bud) onto the cuticle and on the skin around the nail, removing any balm from the nail. This provides a barrier between your skin and the polish preventing it from staining your skin.
Step 4: Now prep your nails using Adorn's topcoat clear polish. This will help strengthen nails, prevent staining,and give a smoother base for your colour.
Step 5: Sick of polish chipping after a day or two? Briony says to apply 3 coats of polish (yes 3) for flawless, more even coverage, ensuring you leave 1-2 minutes of drying time in between each coat.
Applying 3 coats of polish will also give a much longer-lasting application too. Up to a week!
Right, where is my Adorn polish? (No more salon trips - I can do this!)
Step 6: Once touch-dry, apply a layer of Adorn's clear topcoat for glossy, longer-lasting nail colour.
Step 7: Avoiding bumps and knocks after a manicure is almost unavoidable. Arghh!
But Briony’s bump-proof polish tip is going to have you reaching for the phone to share this with your fellow nail lovers.
Okay… Ready?
Once again, wait until your nails are touch-dry, then apply – wait for it……. 1 drop of Adorn’s natural Hand &Cuticle Oil directly onto your nails! Wait what? Oil? Yes, you read that right.
Briony says to apply it towards the cuticle, then ever so gently swipe the oil downwards over the nail/polish. The oil leaves a light film over the nail (creating a slip) which helps prevent a little knock here and there from ruining your manicure.
TRANSCRIPT
Hi, I'm Briony Kennedy, the Founder of Adorn Cosmetics. Now, I've got an event on today and one tonight, so I'm going to show you what I do to not only look and feel good but apply makeup that's going to last the distance. I'm not going to have time to be touching up my makeup, maybe just a little bit of my lipstick, but everything else, I want to know that it's going to stay put. I might use a little bit of rose water to freshen up throughout the day, and if you've got oily skin, you could also use one of our setting powders. But this particular little routine is going to help you go from day to night without too much fuss.
So, the first thing that I've done is prepared my skin. Of course, I have cleansed with a warm waffle. I have put on our serum and, of course, the primer moisturizer. Now, there are two that you can choose. I'm a little bit dehydrated, so I've used the hydration plus. If you've got oily eye area or eye makeup does not last the distance, then avoid putting moisturizer on your eyes during the day.
Alright, so to get started, the first thing that I'm going to use is our illuminizer number two. It's one of the newer colors. It's very light, but it just gives a really nice dewiness to the skin, which at my age or any age, we really want to eradicate the dull look and just give that dewiness back to the skin. So, I'm using the stippling brush for this reason. I'm wanting just a really light coverage, just to give that dewiness to the skin, not so much a highlight, more just a dewiness. And I'm putting that on to the middle of my forehead, on my cheekbones, and my temple area where the sun would naturally hit your skin and give that a luminescence.
You can already see, just with that little bit there, how nice and dewy that's made my skin. Put a little bit across your nose, you could put some on your neck, your decolletage, totally up to you. It's a beautiful product. You can also use that by itself or mix it with, say, for example, your BB cream. It looks beautiful.
Alright, so the next thing that I'm going to do is put on my cream foundation. And the reason I'm going to put this on now, normally when I'm doing my eye makeup, I will do my eyes first so that if I get any fallout, I've not wasted time with concealing and then having to wipe it all away. Today, I'm going to put a little bit of the cream stick on first just so it has time to really warm and work into the skin and become more skin-like because I'm going to layer it up later on with the loose foundation, which is going to lock it down and give me flawless, camera-ready finished skin.
So, just putting a little bit on, and I'm using the medium 10. I'm not going to put it underneath my eyes because I will be putting concealer on there after I've done my eye makeup. Okay, so I'm just sort of dotting it around a little bit. Okay, and then I'm going to buff that in with the Kabuki brush.
Now, I do like to put a little bit of foundation underneath my jaw as well as a little bit on my neck. Now, this is especially important if you have a dark decolletage and your neck and your face are lighter than your chest. You will bring the foundation down your neck, especially if you're exposing the chest area, so that your face, your neck, and the same shade as your decolletage. If you're wearing a high top, then of course, just match it to your neck, and you may not need to bring the product down your neck, but I am going to be wearing a dress today that's a little bit lower cut, so I want to make sure all of this is nice and even.
First, I give it a chance to warm into the skin, and now I'm going to move on to my eye makeup. So, just using our brow brush, brush your brows just to separate the hairs so when you go to use either your pencil or your brow dust, then it's going to get onto the skin more and look more like hairs. So what I'm using is the medium brow dust today with the angle brush because the brow dust does last that little bit longer being a water-resistant mineral. So, I'm using the flat end first, and I'm just flicking up just to make little hair strokes, if you'd like, or with a damp brush, and that will make your brows go on or your brow dust go on that little bit darker.
Now, to avoid droopy eyes, do not pop your brow dust any lower than the edge of your eye, okay, and the edge of your nose. If you have too much brow dust down here, it's going to drag the eye down. As we get older, we kind of want this to start to go outwards more so, and see how that instantly can give the eye a lift. So, you might even want to just pluck a couple of those hairs off the end there and just go with a higher end rather than a lower end, and that's going to give you more awake-looking, open, more youthful-looking eyes.
Okay, so now moving on, um, I will just quickly brush again, and that just simply pushes the brow dust and almost separates it into hairs, and just so I've got no fallout, just give it a quick dust to get rid of any of that excess that may have fallen. All right, so now using the number eight brush, I love this one as a brush for our creamy nude eyelid primer. Okay, now this, as you'll see, just helps to neutralize veins and discoloration on the eyelid. It's perfect as a new nude color. To be honest, you could just set that down with a bit of foundation, nude eyeshadow, and it's a really nice matte. So what that's done is given a nice palette or a clear, clean palette to work on when I put my eyeshadow on, and the eyeshadow is not going to be distorted. Okay, perfect. Now moving on to eyeshadow. Now, I'm wearing a really pretty, pinky sort of, well, it's a really nice autumn sort of pinky dress. So the two colors I'm going with today is spice, and we've got rose quartz. They just look so good together, and I'm going in with our number four brush. It's a really big dome brush, because this darker color, spice, I want to use in the socket, but I don't want it to be too dark and intense. I want the depth of the color, but I just don't want too much intensity as it is a day look, but I also want it to be enough for night time. So the bigger the brush, the more it's going to spread the pigment and give a lighter coverage. So it's just giving me a really nice, so I've just started in the crease here, and then I've just worked that up onto the brow bone. Okay, don't worry about too much if it's fallen down here. I'll show you a secret to get rid of that in a moment. Okay, so moving on to the other eye, just so you can see how much I put on. It's a very, very small amount, and then I tap it off, and I use the lid to swirl that around to get that evenly on the brush. And then straight onto the eye. Doing that is just going to help prevent fallouts. If you just tap off the excess but then press your brush into the lid, it will just get rid of any of that fallout, as I said. Okay, so I've concentrated into the socket here, going back and forth again. A bigger brush is going to spread the product more evenly. If you're a novice, the bigger brushes are going to be better for you, because you're going to find that it puts on less product, and it spreads and blends a lot easier. So you can see how that's really nicely blended.
Okay, so you can increase the depth if you want to. You can make that a little bit darker, but for me, that's enough at the moment. And now, what I'm going to do is place the rose quartz on. Now, you can use one of the flatter brushes if you wanted to. I've got, uh, here again, I've got, say, the number eight, or you might want to use, to be honest, you can use any brush for this. One of the flatter brushes is better though because you're going to be placing the eyeshadow on. When you're working in the crease, you can see that I kind of patted it, but then I worked it around, blending it with an eyeshadow color that you want to take over most of your lid. You'll find that I'm just pressing this on for two reasons. Less fallout, but it also gives a real intensity to the pigment because you're pressing the pigment into that eyeshadow primer, and that's going to make that look more intense. Where if you just wipe this on, it's going to again spread it like this did this color, and you're going to get a lighter color. So if you're wanting it to be a bit more natural, yes, you could wipe it on, but I think when you're looking at eyelid colors, it's always best just to press them onto the eyelid.
Now, when I'm finished blending my eyeshadow and I'm happy with where I've placed it, I'll usually grab a clean dome brush. I'll always have one handy. And then what I do is I just sort of blend that over the edge of the eyeshadow and my nude area of skin, and then that way, it's making the eyeshadow seamless so that there's no set eyeshadow then skin. I don't like seeing the lines, so for me, I use this brush, keep it clean, and have one handy all the time, and then that just helps clean that up and makes it look really nice and seamless. Now, with any eyeshadow that's fallen underneath here, we want to get rid of that because it's going to drag the eyes down, and it can also make you look quite tired. So you can grab a clean cotton tip to do that, or you can also use one of our brushes. You could use a clean brush just dipped in a little bit of your rose water. If you can't, if you've got your Q-tips handy, and you just sweep it. I do like using the brushes because you get kind of like a nice clean line and see how that's just lifted up, almost gives you a bit of an eyeliner look too, cleans up that eyeshadow underneath. Perfect. Okay, and so now what I'm going to do is put on some eyeliner. I'm using black today just because my eyes are a little bit darker, and I feel like the browns not going to be quite enough, so the wind-up black liner I'm going to put under the lash line, starting with the inner rim first. The reason I put it on the inner rim is that it gives the appearance of more lashes, which is great. Then, I'm going to place it on the top, focusing on the outer quarter of the eye, just past the iris. Okay, so now I'm going to do a wing and I'm going to show you a really quick, simple way of doing that. Okay, to do a really quick wing, all you need to do is either use an angled brush and get some eyeliner onto that, and you can flick that up like that, or just wind up your pencil, place it in the wet corner part of your eye and just flick up towards your eyebrow. So, don't drag it, just feather it gently up towards the eyebrow. That's giving you a perfect wing up, rather than following the eye down which will give you a droopy looking eye, and then just connect it. Okay, again, just in that wet part of the corner of the eye, I'm feathering it up. I'm not pulling and dragging, feathering it up towards the brow, giving me an instant wing. And now, I'm just going to join it to this eyeliner here. There we go. Defining eyeliner doesn't stay put for you, especially in the instance of where you're wanting to go from day to night. I'm going to set the eyeliner down with an angled brush and I'm using, in this case, a really dark eyeshadow color. You can use any color you want to either soften the eye line or you can use say, the quartz, or even your brow dust and just pop that over the top.
I'm just pressing that over the line. Not only does this help straighten up your line, but it intensifies the line. And a little bit like the traditional way of putting on your foundation and then you put on a setting powder to set it down is exactly what this process is. You're setting down your eyeliner and importantly, this corner part of the eye is definitely an area that moves and smudges over time. So, if you pop a bit of that on there, there you go. Okay, now clean up any of the fallout that may have come onto the under-eye area. It's important, especially with the darker colors, to get that off. Okay, so moving back to my skin, I'm going to just put now a little bit more of this cream foundation, just focusing more so in the T-Zone, which is usually where most of us need most of our coverage. Just dabbing it. You don't need to put too much on, and remember with these, we do have the travel-size version. So, if you're wanting to try the sticks but you're not too sure, you can also get sample sizes or you can get the travel a little handy wind-up stick, which is just a really good space-saving idea for traveling, of course. But even if you're someone who just gets ready at the gym or what have you, using the Kabuki Brush by just short strokes will give you heavier coverage, and of course, using buffing strokes will push that product further into the skin, which is what I'm wanting today because I'm going to layer this with the loose minerals. Okay, so the loose mineral foundation I'm also going to use in the medium tan. Now you can use a different color loose powder over the cream that's totally fine because usually when you put a loose over the top of a cream, the loose foundation will appear to get darker, and that's simply because you put a loose foundation over the top of something that's wet or more moist or it's got obviously a liquid to it. So, I'm using a pressing, pressing motion now with these minerals, and that is simply because, as I said before, I'd want to look natural. I don't want to look like, whoa, that's a lot of makeup, but I do want to look really flawless because I'm presenting. So, if you are presenting on webinars, I don't know, you're presenting to anybody, or you just like this flawless look for going out, I am pressing this in, and you'll see just how flawless that makes your skin. Happy with that. Now I'm going to put on our Peachy Sleep concealer. Okay, it is one of our very best selling products, and it's just wow. Not only does it brighten your eyes, hence the name Peachy Sleep, you look like you've had the best sleep ever, and I have really dark circles under my eyes without makeup, so this is a winner for me, and I'm just pressing upwards and under the eyeliner. You could gently pull it a little bit and see how that's just instantly given me perfect wing liner.
So, I placed the concealer more in the area of the darkness, and then I've blended it out because you don't want to place your concealer here, making it its thickest where we smile. That is then going to crease, so you put it at its thickest where the dark circles are. You can't hide wrinkles, so it's the circles that we're trying to eliminate. So put the concealer there, and then blend it out, um, so that it's nice and even, but it's not going to crease into your smile lines.
Now, what I also like to do with a slightly lighter concealer, at least the same color, is just put it down my nasal lines here, so you'll see here, and it's just again like things when you put a light color on something that's deep, it'll make it look less so. So that's going to just give a little bit of an enhancement so that these lines are not as Hollow. Just putting a slightly lighter concealer down here. So I've just used the light. You could even try using the primer, the eye primer. It may be totally fine for you as well. Now this Peachy Sleep color is probably not suitable for those of you with beautiful dark skin. Try one of our darker Foundation colors in the cream stick or so in the travel size. So there's some darker stick colors, or you might want to try one of the darker concealers like medium tan or medium Olive.
So, that's the concealer. Now you can definitely set this down, and if you're someone who has, you know, these little dots under your eyes like I do, or you just have some fine lines, I love just using a tiny little bit of our HD Miracle Blue. And look, you'll just see it's just eradicated the look of those bumps as much as they were before. Not only that, but it just very gently puts a veil on that without drying the eyes because you don't want your eyes to look dry because then it will look cracked and not healthy, especially as you get older. It's all about getting dewiness looking in the skin or Radiance to the skin. Just that little bit of a veil that I popped on is just enough to keep that nice and still but not to crease and not to look heavy and Cakey. So then I don't have to worry about my concealer moving throughout the day. Okay, so the next thing that I'm going to do is put on the Contour Compact.
And I'm going to use our angle brush, which is the number three, and I'm just going to put that around my hairline. Now, if you've got blonde or gray hair, you could just use your hand as a marker. You could use the Adorn headband so that you're not getting color into your hair, especially if you've got probably Fair blonde gray hair. You might want to go with this one over more of a cream stick, a cream Contour is more likely to end up moving and getting into your hair, even if you avoid putting it on your hair because it's obviously melting and warming up. It's going to gravitate into the hairline. So try and use one of the powder compacts like this particular one. You might want to make do with a bronzer that you've got, but just remember when you're contouring, you really do need to use something that doesn't have a shimmer because the whole point of contouring is making giving the face shape and usually giving some enhancement to the cheeks by making this area a little bit darker, putting it along the jawline, putting it underneath the chin here, just to help with any sort of saggy skin that you might have here. Okay, so it just makes everything look that bit more smaller and more chiseled. So you'll notice that I'm putting it on all of the high points. So around my forehead, I'm going slightly onto the cheekbone, but more underneath it because I like this to become part of the blush. I don't like a real structured contoured look, okay? And around my jawline, definitely under there where the skin's getting a little bit saggy, and then I will buff this. This is perfect to buff down the neck if you need to bring your neck up to color to match your face and your decolletage. Okay, so that just gives some really beautiful warmth to the skin. Wearing foundation on its own can really make you look quite flat, and in fact, you can look like you've got more makeup on with just foundation than if you add other products simply because they're breaking up the face and giving warmth and a health and a vitality to the skin. Okay, so the blush color that I'm going to use before I finish off my eyes is the Autumn Rose. Again, it's going to be a beautiful color that goes with the dress that I will reveal later in my after photo.
And again, I'm just going to use the same brush. A real small amount just on the apples of the cheeks, dabbing. This color is quite potent, it's very strong, so this pigment you just want to put a little bit on and build it. Now, if you've got a narrow face, you want to go sideways more so with your blush, okay, because that's going to widen the face so you don't look more drawn, okay, which can look quite aging. Or if you've got quite a big face, then yes, you would put it down more of an angle to give that shape, give you more of a narrow look to the face. Now, I'm happy with the placement of this and I'm sort of blending it a little bit up onto the edge of the eyes there, going up into the temple a little bit. Some people like to put it on the sides of their nose, that's up to you. Um, can totally do that, but I'm going to now use a clean brush. I'm all about having a spare set of clean brushes because they act as your blending, so you could use your Kabuki to sweep over to get rid of any of the seams. The seams is where you can see the makeup where it starts and ends, so you could use your Kabuki and look at that perfectly blended. Doesn't change the color for your foundation, or you could use a clean brush and just go over the top of it. The clean brush will not soften it as much as the Kabuki because the Kabuki has a little bit of foundation on there, so you'll find that that one will really tone it down. We're having a clean brush we'll simply just blend it more seamlessly for you, okay? So, that's the blush. Now, I'm just going to put a little bit there, there. Okay, and so now I am going to put on actually my lips first and then I'm going to finish off with my eyes. The eyes are something that I tend to do off camera because I need to get quite close to the mirror, so let's get started with our lips. Now, I'm thinking I might do something a little bit more such nudie, but a little bit more look than something so bold, especially because the dress that I'm wearing is quite bold. So, I'm going to go with a natural pink lip liner and If you've got dry lips, make sure you put balm on at the very beginning of doing your makeup, and then you can wipe the balm off or you'll find your lips have just absorbed it, and then you don't have that cracked looking lips. Now feather your line. If we've got too much balm on, you want the lip liner to grab, so you want to get that off, okay? So feather your line. I don't pull it and drag like this, just feather it, and you'll find you get a straighter line. Resting your fingers on your chins helps with stability, especially as you get older because you'll find that you've got all the creases in your lips. Now, when you do this, it straightens it out, and you can put the liner on, but the minute you relax, you'll find your lip liners all going to be jagged. So definitely put your lip liner on with a relaxed face. All the fundamentals of this look, I'm jumping off camera, getting dressed, finishing my hair, picking a lipstick, and then finishing off with my eyes. And I will, of course, list all the products that I've used in this tutorial below, so you can either grab them and follow along or just utilize something that you've got at home.